Cloud Threat Protection with OSSEC and Suricata
The idea of this setup is to protect the Small Systems as well as we protect the Big Systems.
This solution uses a proven stack to protect webservers from modern threats. Using OSSEC, Suricata, and the built-in firewall capabilities of a modern Linux system it is possible to build a low maintenance and stable threat protection platform with relatively low performance impacts.
It’s been specifically designed to be simple. The idea is that it will keep you on a ’need to know basis’ and otherwise stay quiet and do it’s job.
Overview
Together, these components protect a web server from hacks, bots, spammers, and other nasty network attacks.
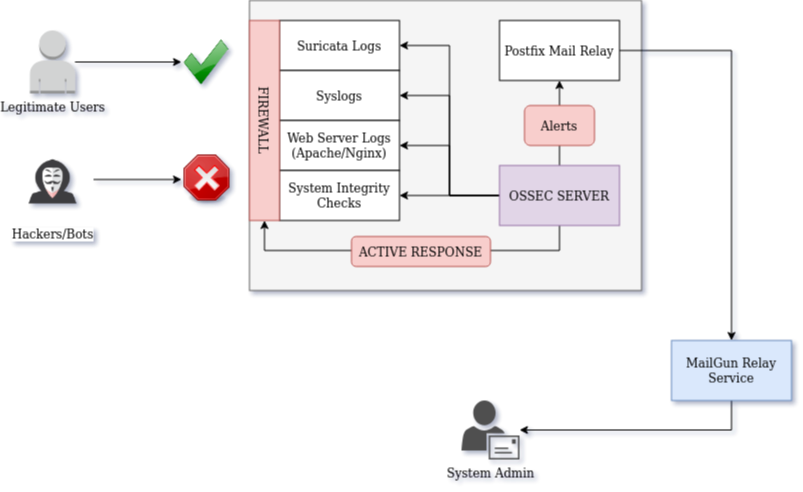
The components of this system are:
- Suricata to detect malicious network traffic,
- OSSEC for system integrity checking and log analysis,
- MailGun for mail relay services
However, there are some substantial limitations of this system. Here’s what it’s not:
- NOT a performance monitoring system
- NOT a downtime detection system
- NOT really an IPS (OSSEC will block high-scoring threats)
- NOT an accounting/auditing system
- Probably not going to get you past a HIPAA/FIPS/PCI-DSS auditor - that will be a lot more involved
Note: IPv4 Addresses
Throughout this post, I will be using RFC-5737 specified public IPv4 addresses. These will represent the three hosts used:
| Name | Address |
|---|---|
| Server | 198.51.100.44 |
| Client | 203.0.113.12 |
| Hacker/Bot | 192.0.2.241 |
These IPv4 addresses are ‘fake’ and non-routable. Don’t try any weird stuff with these.
Configure Emails
Since the primary means for notifications will be good-old-Email, that’s the staring place.
Set up MailGun
To send monitoring emails we’ll set up MailGun as an SMTP relay. This simplifies things slighly by using a dedicated subdomain for mail relay where the Postfix server will connect. It also prevents the server from holding credentials for the main email account.
Mailgun is essentially free, but it does require payment information to prevent abuse of the system.
Once the account is set up, the domain ’example.com’ is verified, the required TXT and MX records are added to the DNS zone. I will be working with ‘mail.example.com’ for this project, and my primary email server lives under the root ’example.com’ domain.
After it’s set up, the wizard will produce a set of SMTP credentials. Save those for the next step.
Set up Postfix
On the server, a mail relay is set up using the Postfix package. This will let the server send emails to the admin mailbox, but it will not be able to receive any or read any mailboxes outside of its own spool.
First, install the packages on the server:
sudo apt install postfix mailutils
Then, the config can be written into /etc/postfix/main.cf
mynetworks = 127.0.0.0/8, [::1]/128
inet_interfaces = 127.0.0.1

relayhost = [smtp.mailgun.org]:587
smtp_sasl_auth_enable = yes
smtp_sasl_password_maps = hash:/etc/postfix/sasl_passwd
smtp_sasl_security_options = noanonymous
smtp_tls_CAfile = /etc/ssl/certs/thawte_Primary_Root_CA.pem
smtp_use_tls = yes
smtpd_relay_restrictions = permit_mynetworks, permit_sasl_authenticated, defer_unauth_destination

alias_maps = hash:/etc/aliases
alias_database = hash:/etc/aliases

smtpd_tls_cert_file=/etc/ssl/certs/ssl-cert-snakeoil.pem
smtpd_tls_key_file=/etc/ssl/private/ssl-cert-snakeoil.key
smtpd_use_tls=yes
Then, the address where alerts will be received is added to /etc/aliases
postmaster:    root
root:          [email protected]
Next, the credentials can be added to /etc/postfix/sasl_passwd
[smtp.mailgun.org]:587 [email protected]:xxx-password-xxx
After the file is created, make sure the permissions are correct:
sudo chown root:root /etc/postfix/sasl_passwd
sudo chmod 0600      /etc/postfix/sasl_passwd
Once all the config files are in place the SASL db can be created.
sudo postmap /etc/postfix/sasl_passwd
Finally, the Postfix service can be restarted to pick up the new config.
sudo systemctl restart postfix
The mail relay can be tested by sending yourself an email:
echo "Hello!" | mail -s 'Test Email' [email protected]
If the email doesn’t arrive within a minute or two, double check the config and look in the syslog for clues.
Suricata Network IDS
Suricata is one of my all time favourite tools for security monitoring. It’s fast, scalable, uses surprisingly few resources, and creates high quality network alerts. I’ve previously used it in another project for a custom Firewall/IDS appliance. In this project, it will only be used to generate an alert feed.
Install Suricata
This will be a typical installation of Suricata based on the official Install Docs.
First, set up the Ubuntu PPA repository.
sudo add-apt-repository ppa:oisf/suricata-stable
The package lists will need to be refreshed before the package can be installed.
sudo apt update
Then the package itself, along with all the runtime dependancies, can be installed on the system.
sudo apt install suricata
Configure Suricata
Once installed, the most important config change to make is to disable the eve.json log output. While this is very useful when building a SIEM, we’re working on something much simpler, so the disk space usage of writing every single packet that hits the server isn’t a great idea.
These changes can be made towards the top of the default config file:
...
outptus:
...
  - eve-log:
      #enabled: yes
      enabled: no
Make sure the classic snort-style output is enabled:
...
outputs:
  - fast:
      enabled: yes
      filename: fast.log
      append: yes
Otherwise, the default settings will be sufficient for this system.
sudo systemctl restart suricata

sudo systemctl enable  suricata
Then a set of rules can be loaded. With version 4 and higher, all rule management is handled through the suricata-update utility. So, the initial set of rules (ET Open) can be downloaded and installed.
sudo suricata-update
sudo kill -USR2 `pidof suricata`
Examine the output of /var/log/suricata/suricata.log and check that all the rules were loaded correctly.
OSSEC Host IDS
OSSEC is a host-based Intrusion Detection System with a proven track record in the field. While it is very scalable and can connect hundreds of nodes to a central server, for this deployment we will install a single standalone system.
Install OSSEC
The OSSEC mainainers have published an easy-install script. It seems to work fairly well for setting up the Apt repository and keys.
wget -q -O - https://updates.atomicorp.com/installers/atomic | sudo bash
Once the repository is set up, update the package lists:
sudo apt update
And install OSSEC.
sudo apt install ossec-hids-server
Once the package and dependancies are installed, stop the service until it can be fully configured.
sudo systemctl stop ossec
Configure OSSEC
Most of the configuration pieces for OSSEC are hidden from normal linux users, so for the rest of this seciton we’ll have to run as an interactive root user:
sudo -i
cd /var/ossec
The main configuration file is located at /var/ossec/etc/ossec.conf and is structured as XML. The first part to change is the email notification settings inside the ‘global’ section. The notable piece is that ossec itself is not sending email directly - instead, it’s handing it off to the local Postfix relay server on localhost.
<global>
    <email_notification>yes</email_notification>
    <email_to>[email protected]</email_to>
    <smtp_server>localhost</smtp_server>
    <email_from>[email protected]</email_from>
    <email_maxperhour>6</email_maxperhour>
</global>
If desired, you can whitelist your own IPv4 address as well. This will prevent being locked out of the system if you do something dumb.
<global>
  <white_list>203.0.113.12</white_list>
</global>
Next, modify the email alert threshold if desired. The default level is ‘7’ - Which does give a lot of useful albeit slightly spammy notifications about integrity changes. If this isn’t desired it can be increased. In my case, I prefer to set up unattended-upgrades on my cloud servers so that they stay up to date on security patches. This can generate lots of unnecessary email alerts that are just annoying. Like everything security related, there are tradeoffs.
  <alerts>
    <log_alert_level>1</log_alert_level>
    <email_alert_level>9</email_alert_level>
  </alerts>
Active Responses
Active-response is a built in system that will take action to block a detected attack. In a base OSSEC install it is configured reasonably - however once we add network alerts it can quickly start to block legitimate traffic. So, the default intervention level will be increased from 7 to 9. I also suggest decreasing the ‘ban time’ from the default (30 minutes) to 5 minutes until all the false-positives can be resolved.
  <!-- Active Response Config -->
  <active-response>
    <command>host-deny</command>
    <location>local</location>
    <level>9</level>
    <timeout>300</timeout>
  </active-response>

  <active-response>
    <command>firewall-drop</command>
    <location>local</location>
    <level>9</level>
    <timeout>300</timeout>
  </active-response>
Full documentation for this feature is available in the ossec manual.
Integrate Suricata logs into OSSEC
Finally, the most important piece of the puzzle is to direct OSSEC to read the Suricata alert log. This gives the monitoring system full visibility into both OS behaviour, and incoming/outgoing network activity.
  <localfile>
    <log_format>snort-fast</log_format>
    <location>/var/log/suricata/fast.log</location>
  </localfile>
Once complete, the OSSEC service can be started.
sudo systemctl start ossec
The log file, /var/ossec/logs/ossec.log can be checked for errors after startup. If it’s successful, there should be an email sent within a minute of startup.
OSSEC HIDS Notification.
2020 May 16 02:17:16

Received From: my-cool-server->ossec-monitord
Rule: 502 fired (level 3) -> "Ossec server started."
Portion of the log(s):

ossec: Ossec started.
Create Alert Rules
After the service iteslf is configured, there are a few tweaks to make.
Without adding custom rules, OSSEC’s understanding of Network IDS alerts is fairly basic, only generating a level 8 alert the first time a ’new’ Suricata/Snort alert is fired. Fortunately, we can add some rules to help make sense of the Suricata output. Remember, suricata alerts range from 1-3 with 1 being most severe, and ossec alerts range from 0-15 with 15 being most severe.
| Rule ID | OSSEC Level | Suricata Level | Alert Count |
|---|---|---|---|
| 3000001 | 7 | 2 | 1 |
| 3000002 | 8 | 2 | 5 |
| 3000003 | 9 | 2 | 10 |
| 3000004 | 10 | 2 | 20 |
| 3000005 | 11 | 2 | 50 |
| 3000011 | 10 | 1 | 1 |
| 3000012 | 11 | 1 | 5 |
| 3000013 | 12 | 1 | 10 |
| 3000014 | 13 | 1 | 20 |
| 3000015 | 14 | 1 | 50 |
These rules can be added to the /var/ossec/rules/local_rules.xml file.
Most important is to establish OSSEC alerts for the higher severity Suricata alerts:
<group name="snort-fast,">

  <!-- Alert if a level 1 threat is identified -->
  <rule id="300011" level="10">
    <category>ids</category>
    <match>[Priority: 1]</match>
    <description>Suricata level 1 alert</description>
  </rule>

  <!-- Alert if multiple level 1 threats are identified -->
  <rule id="300012" level="11" frequency="5" timeframe="120" ignore="90">
    <if_matched_sid>300011</if_matched_sid>
    <same_source_ip />
    <description>Many high-severity Suricata alerts</description>
  </rule>

  <rule id="300013" level="12" frequency="10" timeframe="120" ignore="90">
    <if_matched_sid>300011</if_matched_sid>
    <same_source_ip />
    <description>Several high-severity Suricata alerts</description>
  </rule>

  <rule id="300014" level="13" frequency="20" timeframe="120" ignore="90">
    <if_matched_sid>300011</if_matched_sid>
    <same_source_ip />
    <description>Numerous high-severity Suricata alerts</description>
  </rule>

  <rule id="3000015" level="14" frequency="50" timeframe="120" ignore="90">
    <if_matched_sid>300011</if_matched_sid>
    <same_source_ip />
    <description>Multiple high-severity Suricata alerts</description>
  </rule>

</group>
Then additional rules can be created to deal with less-severe Suricata alerts:
<group name="snort-fast,">

  <!-- Alert if a level 2 threat is identified -->
  <rule id="300001" level="7">
    <category>ids</category>
    <match>[Priority: 2]</match>
    <description>Suricata level 2 alert</description>
  </rule>

  <!-- Alert if multiple level 2 threats are identified -->
  <rule id="300002" level="8" frequency="5" timeframe="120" ignore="90">
    <if_matched_sid>300001</if_matched_sid>
    <same_source_ip />
    <description>Many medium-severity Suricata alerts</description>
  </rule>

  <rule id="300003" level="9" frequency="10" timeframe="120" ignore="90">
    <if_matched_sid>300001</if_matched_sid>
    <same_source_ip />
    <description>Several medium-severity Suricata alerts</description>
  </rule>

  <rule id="300004" level="10" frequency="20" timeframe="120" ignore="90">
    <if_matched_sid>300001</if_matched_sid>
    <same_source_ip />
    <description>Numerous medium-severity Suricata alerts</description>
  </rule>

  <rule id="300005" level="11" frequency="50" timeframe="120" ignore="90">
    <if_matched_sid>300001</if_matched_sid>
    <same_source_ip />
    <description>Multiple medium-severity Suricata alerts</description>
  </rule>

</group>
Finally, reload the service for the rules to update.
/var/ossec/bin/ossec_control reload
Check for errors in the log file - /var/ossec/logs/ossec.log
Test Alerts
Once set up, a few tests can be performed on the system. The most likely to create an alert is to simply nmap the system:
nmap -A 198.51.100.44
Within a second or two there will be many alerts generated in the suricata log file. Then, OSSEC will pick these up and add them to the alerts spool. Next these alerts will be aggregated and counted which should trigger the higher-severity events. And, ideally this will generate an email alert like this one:
OSSEC HIDS Notification.
2020 May 14 22:10:18

Received From: my-cool-server->/var/log/suricata/fast.log
Rule: 300012 fired (level 11) -> "Many high-severity Suricata alerts"
Src IP: 192.0.2.241
Dst IP: 198.51.100.44
Portion of the log(s):

05/14/2020-22:10:17.391373  [**] [1:2024364:3] ET SCAN Possible Nmap User-Agent Observed [**] [Classification: Web Application Attack] [Priority: 1] {TCP} 192.0.2.241:35004 -> 198.51.100.44:80
....

 --END OF NOTIFICATION
If you’re lucky, this will also kick in an active response. When this happens, OSSEC will add a firewall block to IPTables preventing any communication with the ‘offending’ endpoint.
Real Alerts
After a couple days of being exposed to the internet, it’s quite likely that one or two bots will try to hack your server. So, given some time there should be an email or two like this:
OSSEC HIDS Notification.
2020 May 17 20:16:34

Received From: my-cool-server->/var/log/suricata/fast.log
Rule: 300011 fired (level 10) -> "Suricata level 1 alert"
Src IP: 192.0.2.241
Dst IP: 198.51.100.44
Portion of the log(s):

05/17/2020-20:16:33.926136  [**] [1:2029790:3] ET SCAN ELF/Mirai Variant User-Agent (Inbound) [**] [Classification: Attempted Administrator Privilege Gain] [Priority: 1] {TCP} 192.0.2.241:47586 -> 198.51.100.44:80

 --END OF NOTIFICATION
This means that a real live Marai botnet node tried to assimilate my box!

Since it generated a high severity network alert, the intrusion was immediately blocked and the offending IP banned. You can find this in the log file:
/var/ossec/logs/active-responses.log
Sun May 17 21:11:31 UTC 2020 /var/ossec/active-response/bin/firewall-drop.sh add - 192.0.2.241 1589749891.52882 300001
This can also be verified by checking IPtables rules:
sudo iptables -L -v
Conclusion
After all the pieces are set up, this becomes a fairly low maintenance system. Of course, there will be incidents where the IDS/IPS blocks some legitimate traffic. But that’s part of life in the modern security landscape.
With high profile hacks and cyberattacks more and more frequently, it’s all of our responsibility to do our best to secure our servers to the best of our abilities.
If you have any suggestions, feel free to reach out. Quarantine is killing me!