How to turn anything into a router
I don’t like to cover “current events” very much, but the American government just revealed a truly bewildering policy effectively banning import of new consumer router models. This is ridiculous for many reasons, but if this does indeed come to pass it may be beneficial to learn how to “homebrew” a router.
Fortunately, you can make a router out of basically anything resembling a computer.
I’ve used a linux powered mini-pc as my own router for about six years, and have posted a few times before about how to make linux routers and firewalls in that time. It’s been rock solid stable, and the only issue I’ve had over the years was wearing out a $20 mSATA drive. While I use Debian, Alpine linux probably works just as well, perhaps better if you’re familiar with it. As long as the device runs Linux well and has a couple USB ports, you’re good to go. Mini-PCs, desktop PCs, SBCs, rackmount servers, old laptops, or purpose built devices will all work.
Hardware selection
My personal preference is a purpose-made mini PC with a passively cooled design.
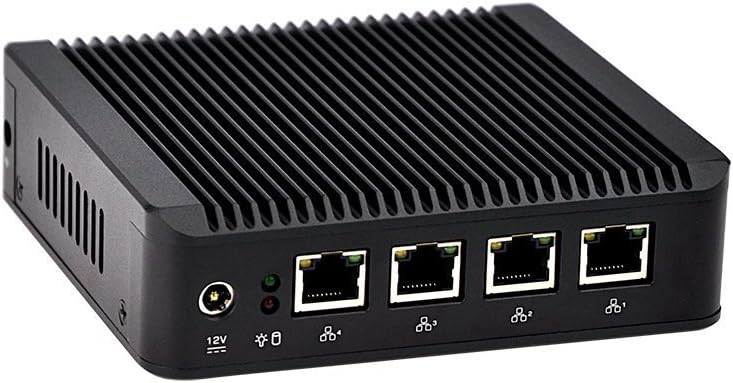
However, basically anything will work. It should have two Ethernet interfaces, but a standard USB-Ethernet dongle will also do the trick. It won’t be as reliable as an onboard interface, but will probably be good enough. For example, this janky pile of spare parts can easily push 820-850mbps on the wired LAN and ~300 mbps on the wireless network:

This particular device is a Celeron 3205U dual core running at a blistering 1.5 GHz. Even that measly chip is more than capable of routing an entire house or small business worth of traffic.
When set up, the system will be configured like this:
| Interface | Network |
|---|---|
| eth0 | WAN |
| eth1 | LAN (Wired) |
| wlan0 | LAN (Wireless) |
Both LAN interfaces will be bridged together, meaning that devices on the wired and wireless networks will be able to communicate normally. If one LAN port isn’t enough, you can plug in as many USB Ethernet dongles as you need and bridge ’em all together. It won’t be quite as fast as a “real” switch, but if you’re looking for performance you might’ve come to the wrong place today.
Also, I should mention that I’ll only be setting up IPv4 here. IPv6 works great for stuff like mobile devices, but I still find it too frustrating inside a LAN. Perhaps my brain is too calcified already, but I’ll happily hold out on IPv4 for now.
Install & Setup
Overall, it’s a pretty standard Debian install. A couple things I should mention:
- Disable PXE network boot in the BIOS/UEFI setup.
- If you can, set the device to the lowest clock speed, but disable any power management for USB or PCI devices.
- Find the option like “Restore after AC Power Loss” and turn it ON.
- Some devices won’t properly power up if there’s no display connected. If your device is like this, stick a “dummy dongle” into the HDMI port.
- Lots of hardware will only work correctly with the
non-free-firmwarerepository enabled
After the initial install is done, there are some additional utilities to install:
sudo apt install bridge-utils hostapd dnsmasq
In terms of software, that’s about all that’s needed. There should be about 250 packages on the system in total.
Name the interfaces properly
In modern Linux systems, the network interface names are named based on physical connection and driver type, like enp0s31f6. I find the old format, like ethX much simpler, so each interface gets a persistent name.
For each network interface, create a file at /etc/systemd/network/10-persistent-ethX.link
[Match]
MACAddress=AA:BB:CC:DD:00:11

[Link]
Name=ethX
Create the wireless network
This uses a USB Wi-Fi dongle to act as an access point, creating a network for other devices to join. This will not work as well as a purpose built device, but it’s better than nothing. I’ve had reasonably good results with this, but I also live in a very small building where I’m rarely more than 10m away from the router.
Create a config file, /etc/hostapd/hostapd.conf
interface=wlan0
bridge=br0
hw_mode=g
channel=11
ieee80211d=1
country_code=US
ieee80211n=1
wmm_enabled=1

ssid=My Cool and Creative Wi-Fi Name
auth_algs=1
wpa=2
wpa_key_mgmt=WPA-PSK
rsn_pairwise=CCMP
wpa_passphrase=mysecurepassword
By default the hostapd service is not startable, so we unmask it before enabling the service.
sudo systemctl unmask hostapd
sudo systemctl enable --now hostapd
Configure the interfaces
The “outside” interface will be the WAN, and the “inside” will be the LAN. Note that the LAN interface does not get a default gateway.
/etc/network/interfaces
allow-hotplug eth0
allow-hotplug eth1
auto wlan0
auto br0

iface eth0 inet dhcp

iface br0 inet static
    bridge_ports eth1 wlan0
    address 192.168.1.1/24
After this step, the device should have a quick reboot. It should come back up nicely. If it doesn’t confirm that the previous steps were done correctly, and check for errors by running journalctl -e -u networking.service
If it all worked correctly, the output of this command should be the same:
$ sudo brctl show br0

bridge name     bridge id            STP enabled    interfaces
br0             8000.xxxxx           no             eth1
                                                    wlan0
IP Forwarding
Create /etc/sysctl.d/10-forward.conf and add this line to enable IP forwarding:
net.ipv4.ip_forward=1
Apply the changes:
sudo systemctl restart systemd-sysctl.service
Firewall rules
The firewall rules and NAT configuration are both handled by the new netfilter system in Linux. We manage this using nftables.
/etc/nftables.conf
#!/usr/sbin/nft -f

flush ruleset

table inet filter {
    chain input {
        type filter hook input priority 0; policy drop;
        ct state { established,related } counter accept
        ip protocol icmp counter accept
        iifname "br0" tcp dport { 22, 53 } counter accept
        iifname "br0" udp dport { 53, 67, 68 } counter accept
        counter
    }

    chain forward {
        type filter hook forward priority 0; policy drop;
        iifname "eth0" oifname "br0" ct state { established,related } counter accept
        iifname "br0" oifname "eth0" ct state { new,established,related } counter accept
        counter
    }

    chain output {
        type filter hook output priority 0; policy accept;
        counter
    }
}

table ip nat {
    chain postrouting {
        type nat hook postrouting priority 100; policy accept;
        oifname "eth0" counter masquerade
    }
}
This performs NAT, denies all inbound traffic from outside the network, and allows the router device to act as a DNS, DHCP, and SSH server (for management). Pretty much a bog standard firewall config.
Enable this for the next boot:
sudo systemctl enable nftables.service
DHCP and DNS
Unlike my previous devices, this will use dnsmasq instead of isc-dhcp-server and bind9. It’s smaller, easier to configure, and works just as well for the purposes of a small device like this. The configuration file is ridiculously simple, and you can’t argue with that!
/etc/dnsmasq.conf
interface=br0
listen-address=0.0.0.0
dhcp-range=192.168.1.50,192.168.1.250,255.255.255.0,6h
dhcp-option=option:router,192.168.1.1
dhcp-option=option:dns-server,192.168.1.1
The service can be enabled for next boot.
sudo systemctl enable dnsmasq
Bonus: Serial port
If your device has an onboard serial or console port, it’s a super handy way to manage the router without having to find a monitor and keyboard to plug into it. This is extremely common in the enterprise network space, but there’s no reason a home device shouldn’t have the same capability!
Modify /etc/default/grub
GRUB_CMDLINE_LINUX='console=tty0 console=ttyS0,115200n8'
GRUB_TERMINAL=serial
GRUB_SERIAL_COMMAND="serial --speed=115200 --unit=0 --word=8 --parity=no --stop=1"
Then enable the Getty service to run on the port:
sudo systemctl enable [email protected]
Update the grub bootloader config, and restart the box.
sudo update-grub
Check how it’s working
After it’s all configured, give the device a couple restarts to make sure everything will come up reliably.
The status of the firewall can be checked to make sure traffic is moving through the network:
$ sudo nft list ruleset

table inet filter {
	chain input {
		type filter hook input priority filter; policy drop;
		ct state { established, related } counter packets 1546 bytes 138508 accept
		ip protocol icmp counter packets 1 bytes 84 accept
		iifname "br0" tcp dport { 22, 53 } counter packets 4 bytes 240 accept
		iifname "br0" udp dport { 53, 67, 68 } counter packets 92 bytes 6658 accept
		counter packets 2110 bytes 128536
	}

	chain forward {
		type filter hook forward priority filter; policy drop;
		iifname "eth0" oifname "br0" ct state { established, related } counter packets 52964 bytes 479878687 accept
		iifname "br0" oifname "eth0" ct state { established, related, new } counter packets 78017 bytes 54802223 accept
		counter packets 0 bytes 0
	}

	chain output {
		type filter hook output priority filter; policy accept;
		counter packets 1650 bytes 155966
	}
}
table ip nat {
	chain postrouting {
		type nat hook postrouting priority srcnat; policy accept;
		oifname "eth0" counter packets 101 bytes 15882 masquerade
	}
}
Before making any changes to the firewall config, be sure to validate the config file:
sudo nft -c -f /etc/nftables.conf
A nice advantage of nftables over the older iptables is the ability to reload the service to update the ruleset without disruption:
sudo systemctl reload nftables.service
The DHCP server can be checked by looking at its log, and checking the lease file:
sudo less /var/lib/misc/dnsmasq.leases
sudo journalctl -eu dnsmasq.service
More things it can do
At this point, the device should work pretty much perfectly. If desired, there are a few more features that can be configured or added with additional packages:
- Logging specific rule hits, or creating flow logs
- VLANs and segmentation
- Reporting and alerts
- IPv6
- Real-time monitoring
- Port forwarding outside traffic to a device in a DMZ network
- VPN remote access and site-to-site tunnels
- Dynamic routing protocols, IGPs, BGP, etc.
- Network filtering and blocking
- Intrusion detection and prevention
The beauty of something like this is the simplicity and reliability. While it may seem appealing, I would highly recommend against installing loads of software right on the router, and instead forward traffic to a device in a DMZ or VLAN.
We have the power to make anything into a router. Try it! Find a pile of e-waste, look for some pieces that work, and build a new router based on free software!