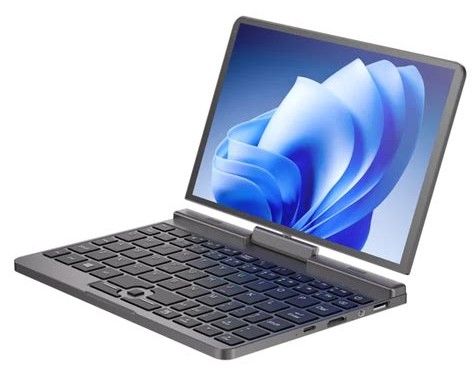
Linux on the P8 Aliexpress Mini Laptop
I finally caved and bought one of the no-name 8" mini laptops from Aliexpress. I’ve had my eye on these for a long time. Really, since the days of my youth with the Sony Vaio P and other iconic UMPCs of the early 00’s. The game changer was the original GPD Pocket from a few years back. Now, there’s a cambrian explosion of cool tiny computers coming from China.
This particular one was sold under the name “Topton”, but also appears under “Crelander”, “Aslay”, and a few other storefront names.
Specs:
- 8" 1280 x 800 display
- Intel N100 12th gen CPU
- 12 GB DDR5 memory
- 256 GB SSD
But really, where this shines is in its size and portability. Frankly, it’s just tiny. It’s smaller than a Nintendo Switch, lighter than a roll of quarters, and takes up just a little less than half the footprint of my current laptop, the Thinkpad X280.
There are some quirks, but I’m overall quite happy with it so far. There are obviously some compromises to make this packaging work. The keyboard is cramped, with several keys moved around to strange locations as a compromise to make the home row keys usable.
The factory Windows install was surprisingly sparse. Unlike your standard Lenovo which comes with two different antivirus trials and dubious spyware, this machine came with absolutely nothing pre-installed. There was a user created rather than the windows “OOBE” setup screen, but otherwise was a very clean install.
Overall, the experience of installing Linux was fairly standard. It did require an upgrade to the latest “Testing” version of Debian to get Wifi support, which is to be expected on newer hardware. Most of the quirks had to do with the rotated display rather than the hardware itself.
Getting to the BIOS
After a few reboots, I managed to determine the correct keys to hit to get into the UEFI. This didn’t really seem to be documented.
- To get into BIOS: Del
- To boot to USB Fn + F11
Installing Debian
Installing Debian from the netinstall iso was a breeze thanks to the built-in Ethernet port at the back of the device. Since the display is rotated, it put a bit of a kink in my neck, but the install was overall seamless.
Upgrading Debian
After a Debian 12/Bookworm install, the Wifi module did not work, since the AX101 wifi card was not supported by the older 6.1 kernel. Rather than install a backport kernel, I opted to simply install 13/Trixie which is currently the Testing branch.
/etc/apt/sources.list
deb https://deb.debian.org/debian/ trixie contrib main non-free non-free-firmware
deb https://deb.debian.org/debian/ trixie-updates contrib main non-free non-free-firmware
deb https://deb.debian.org/debian/ trixie-proposed-updates contrib main non-free non-free-firmware
deb https://deb.debian.org/debian/ trixie-backports contrib main non-free non-free-firmware
deb https://security.debian.org/debian-security/ trixie-security contrib main non-free non-free-firmware
Then a pretty standard upgrade process:
sudo apt update
sudo apt full-upgrade
sudo apt autoremove
Configure GRUB
A few cmdline options are added to force the machine to bootup rotated correctly:
/etc/default/grub
GRUB_TIMEOUT=0
GRUB_GFXMODE=800x1280
GRUB_CMDLINE_LINUX_DEFAULT="quiet splash"
GRUB_CMDLINE_LINUX="fbcon=rotate:1 video=DSI-1:panel_orientation=right_side_up"
Install Plymouth
This isn’t strictly necessary, I just like how a clean bootup splash screen works.
sudo apt install plymouth plymouth-themes
sudo plymouth-set-default-theme -R spinner
Gnome GDM login screen
After the Gnome is configured with the monitor rotated 90 degrees, the configuration can be applied to the login screen as well.
sudo cp ~/.config/monitors.xml /var/lib/gdm3/.config/
sudo chown Debian-gdm:Debian-gdm /var/lib/gdm3/.config/monitors.xml
Gnome addons
These are also not required, but I just like adding some pieces to make Gnome a bit easier to use.
sudo apt install gnome-shell-extension-appindicator gnome-shell-extension-caffeine gnome-shell-extension-prefs gnome-shell-extension-system-monitor gnome-shell-extensions
Finish up and restart
Before restarting, be sure to update the grub bootloader config
sudo update-grub
After this, the screen should appear rotated correctly on startup.
Drawing tablet rotation with libinput
Even though gnome could easily handle rotating the display output and touchscreen input, it took some fiddling to get the drawing tablet & pen to work correctly.
Find the device name for the stylus input:
sudo libinput list-devices
Somewhere in the output, find the stylus device:
...
Device:           ELAN Touchscreen Stylus
Kernel:           /dev/input/event10
Group:            7
Seat:             seat0, default
Size:             164x291mm
Capabilities:     tablet
Tap-to-click:     n/a
Tap-and-drag:     n/a
Tap drag lock:    n/a
Left-handed:      disabled
Nat.scrolling:    n/a
Middle emulation: n/a
Calibration:      identity matrix
Scroll methods:   none
Click methods:    none
Disable-w-typing: n/a
Disable-w-trackpointing: n/a
Accel profiles:   none
Rotation:         n/a
...
Then the input calibration can be set:
- Rotate left: “
0 -1 1 1 0 0” - Rotate right: “
0 1 0 -1 0 1”
In my case, the display needed to be rotated 90 degrees to the right.
To get it applied persistently, we need the device ID. This needs to be a very specific software identifier, because the touchscreen and pen input use the same hardware.
sudo udevadm info /dev/input/event10 | grep DEVPATH

DEVPATH=/devices/pci0000:00/0000:00:14.0/usb1/1-6/1-6:1.0/0003:04F3:2F33.0003/input/input17/event10
A udev rule is created to apply this change at bootup:
/etc/udev/rules.d/99-calibration.rules
ENV{DEVPATH}=="/devices/pci0000:00/0000:00:14.0/usb1/1-6/1-6:1.0/0003:04F3:2F33.0003/input/input17/event10", ENV{LIBINPUT_CALIBRATION_MATRIX}="0 1 0 -1 0 1"
To make the rules take effect:
sudo udevadm control --reload-rules
sudo udevadm trigger
Check that the config is in place:
sudo udevadm info /dev/input/event10 | grep LIBINPUT_CALIBRATION_MATRIX

E: LIBINPUT_CALIBRATION_MATRIX=0 1 0 -1 0 1
Note: It may take a reboot for this to take effect.
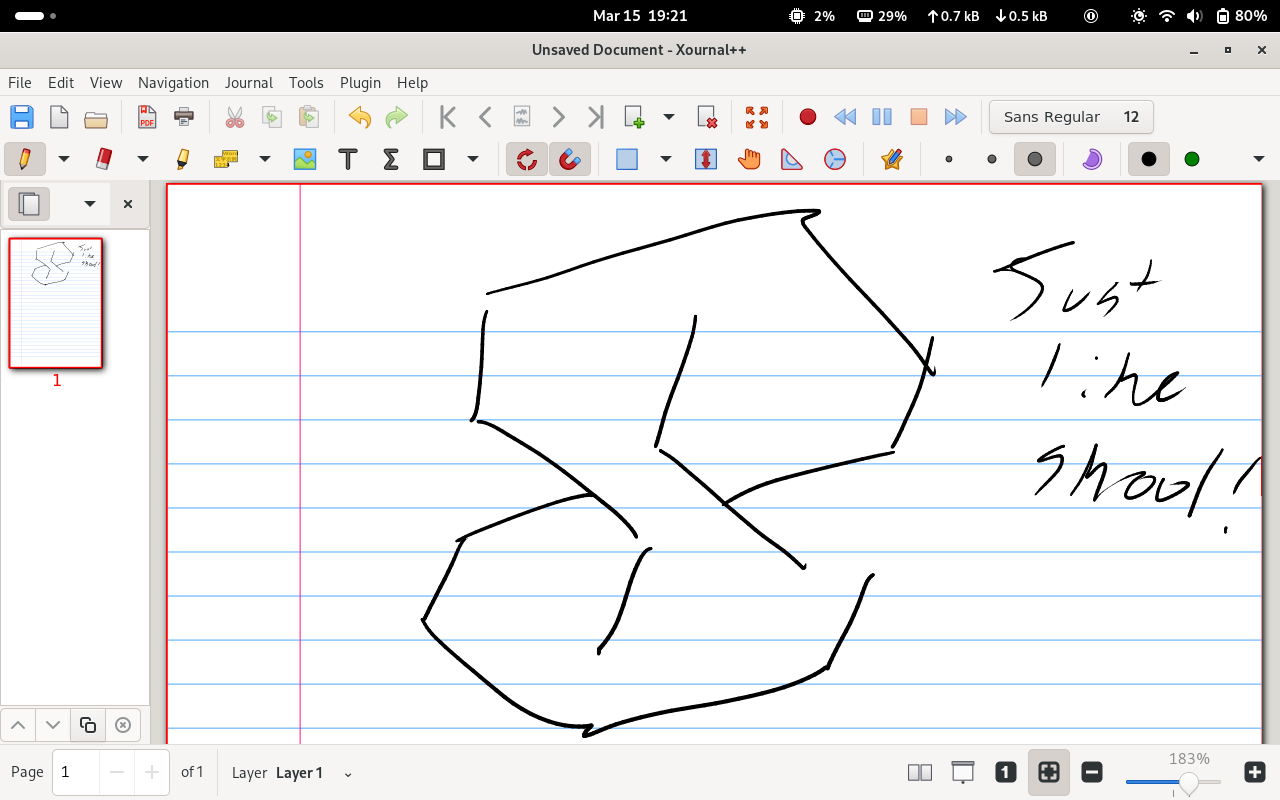
Drawing with the pen
Xournal++ is a nice little application for sketching, drawing, doodling, etc.
sudo flatpak install com.github.xournalpp.xournalpp
Out of the box, this supports pressure sensitivity from the graphics tablet.
Enjoy!
I’ve been playing with the machine for a couple weeks now, and it will absolutely become a part of my everyday-carry kit! It’s already passed the “wife-test” with its sketching capabilities. The one thing I couldn’t really get figured out was automatic rotation. In the future I might revisit and revise this post once I get that feature working. While it probably won’t fully replace my large 12" X280, but it will be a very handy little machine to take on the road.
More Reading
- https://wiki.leighhack.org/projects/aliexpress_p8/
- https://wiki.debian.org/DebianTesting
- https://askubuntu.com/questions/1003964/how-to-rotate-login-screen-in-gdm3
- https://www.reddit.com/r/gpdwin/comments/onoegr/linux_boot_screen_fix/
- https://www.reddit.com/r/techsupport/comments/1cvb6we/how_to_fix_accelerometer_and_touchscreen/
- https://wiki.archlinux.org/title/Libinput#Via_Udev_Rule
- https://wiki.archlinux.org/title/Calibrating_Touchscreen#Do_it_automatically_via_a_udev_rule