Domesticated Kubernetes Networking
I have wanted to run Kubernetes at home for some time, but the main obstacle has been a reliable solution for providing load balancing for ingress or services, and the lack of a reasonable way to manage NAT transparently. While publicly routable IPv4 addresses are seemingly limitless* in the cloud, typically we only get one at home.
Similarly, there isn’t a straightforward way to build cloud-ey load balancers at home. While Google and Amazon can conjure up magic TCP load balancers on their complex overlay network platform, we don’t really have that luxury outside of the cloud. Rather, my costs are sunk and my gear is paid for. Any functionality they didn’t come with from the factory has to be hacked on with Linux and cussing.
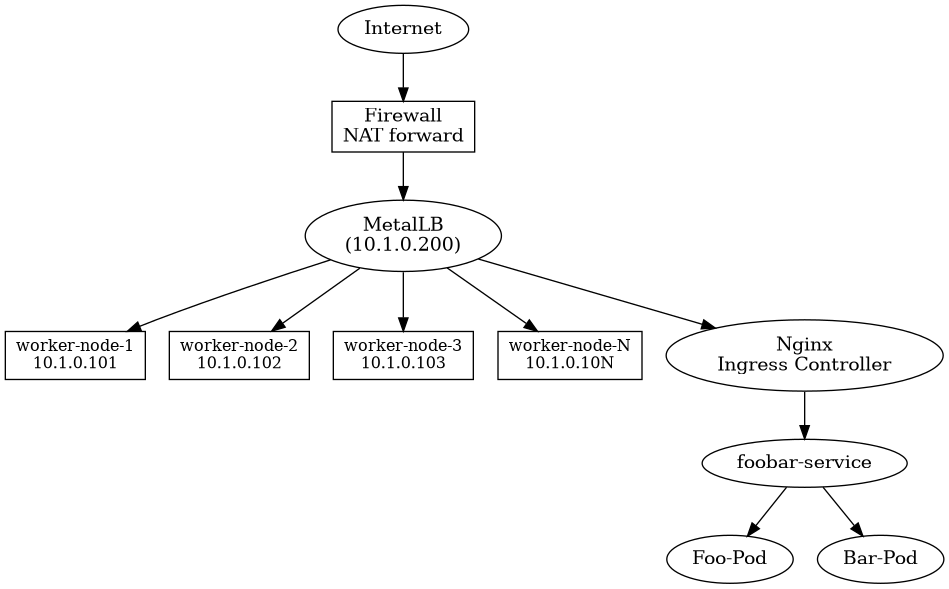
The solution is to combine existing technologies in a new way. To accomplish this, I will combine MetalLB, Nginx ingress, a couple flat VLANs, and dynamic IPTables configuration to automate NAT bindings.
Of course, the standard disclaimer applies here. I will not say that this is a good idea, or that any sane person should do these things. This is strictly an exploration of some novel technology that I find interesting, working to solve a problem that nobody really has. With that said, enjoy!
Cluster Configuration
My test cluster consists of four active nodes:
| Hostname | IPv4 Address | Role | CPUs | Memory |
|---|---|---|---|---|
| control-node-0 | 10.1.0.100 | Master | 2 | 4G |
| worker-node-1 | 10.1.0.101 | Worker | 2 | 8G |
| worker-node-2 | 10.1.0.102 | Worker | 2 | 8G |
| worker-node-3 | 10.1.0.103 | Worker | 2 | 8G |
This cluster is built on vanilla Kubernetes 1.21 installed with Kubeadm, and running Calico for the pod network overlay. There is no other “fancy stuff” going on here, as I like to keep things as simple and clean as possible.
MetalLB (the load balancer for poor people)
Since I don’t have a “real” cloud, I can’t create true network load balancers. Instead, I will use MetalLB for this purpose. It’s still a beta product, so don’t use this in production unless you really like taking risks.
In its simplest form, MetalLB works very similarly to HSRP or Keepalived, where one node is assigned as the role holder for a virtual IP.
It then assigns that to one of its network bridges and listens on the virtual IP for requests. Then, requests are forwarded to the kube-proxy which sends them to their respective services and pods.
The important thing to note is that MetalLB is not really a load balancer in this setup, it’s more or less a floating IP to provide failover. All requests are directed to a single node, then redistributed. This isn’t ideal, but it’s good enough for our purposes. I’m sure a more robust solution will emerge in time.
Install MetalLB on the cluster
Before MetalLB can be installed, some small patches must be made to the existing kube-proxy config to allow non-bound IPs to communicate with the node.
kubectl get configmap kube-proxy -n kube-system -o yaml | \
  sed -e "s/strictARP: false/strictARP: true/" | \
  kubectl diff -f - -n kube-system

kubectl get configmap kube-proxy -n kube-system -o yaml | \
  sed -e "s/strictARP: false/strictARP: true/" | \
  kubectl apply -f - -n kube-system
Then, the manifests can be applied to install MetalLB on the cluster:
kubectl apply -f https://raw.githubusercontent.com/metallb/metallb/v0.9.6/manifests/namespace.yaml

kubectl apply -f https://raw.githubusercontent.com/metallb/metallb/v0.9.6/manifests/metallb.yaml

kubectl create secret generic -n metallb-system memberlist --from-literal=secretkey="$(openssl rand -base64 128)"
If installed correctly, the pods will be visible in the metallb-system namespace:
$ kubectl get pods -n metallb-system

NAME                              READY   STATUS    RESTARTS   AGE
pod/controller-64f86798cc-dsb8t   1/1     Running   0          104s
pod/speaker-22wwl                 1/1     Running   0          104s
pod/speaker-6lxrs                 1/1     Running   0          104s
pod/speaker-nnpkb                 1/1     Running   0          104s
pod/speaker-rbvpn                 1/1     Running   0          104s
The final step is to apply a manifest specifying the IPv4 range the load balancers may occupy. This file, metallb-config.yaml allows 20 IP addresses in the 10.1.0.0/24 subnet:
apiVersion: v1
kind: ConfigMap
metadata:
  namespace: metallb-system
  name: config
data:
  config: |
    address-pools:
    - name: default
      protocol: layer2
      addresses:
      - 10.1.0.200-10.1.0.220
Finally, it can be applied to the cluster:
kubectl apply -f metallb-config.yaml -n metallb-system
Nginx Ingress Controller
While some distributions come pre-configured with Nginx for ingres, I have chosen to install it myself.
kubectl apply -f https://raw.githubusercontent.com/kubernetes/ingress-nginx/master/deploy/static/provider/baremetal/deploy.yaml
This will install most of the needed components, but it is missing the connection for LoadBalancer type services, and relies on only NodePort or HostPort service types. This simply creates a service of type LoadBalancer for the Ingress controller to use:
---
apiVersion: v1
kind: Service
metadata:
  labels:
    app.kubernetes.io/name: ingress-nginx
    app.kubernetes.io/instance: ingress-nginx
    app.kubernetes.io/version: 0.45.0
    app.kubernetes.io/component: controller
  name: ingress-nginx-controller
  namespace: ingress-nginx
spec:
  type: LoadBalancer
  externalTrafficPolicy: Local
  ports:
    - name: http
      port: 80
      protocol: TCP
      targetPort: http
    - name: https
      port: 443
      protocol: TCP
      targetPort: https
  selector:
    app.kubernetes.io/name: ingress-nginx
    app.kubernetes.io/instance: ingress-nginx
    app.kubernetes.io/component: controller
After this manifest is applied, the service will expose its IPv4 address on the private network:
$ kubectl -n ingress-nginx get service
NAME                                 TYPE           CLUSTER-IP      EXTERNAL-IP       PORT(S)                      AGE
ingress-nginx-controller             LoadBalancer   10.98.99.38     10.1.0.200        80:31347/TCP,443:30495/TCP   35m
ingress-nginx-controller-admission   ClusterIP      10.102.49.124   <none>            443/TCP                      35m
Any new ingress-enabled services will have access to this IP now, and all internal (on the local network) clients will be able to access the applications through the nginx ingress.
However we must still contend with the port forwarding through the NAT.
Automate NAT rules for Ingress load-balancer
Since my router is a simple Linux server, it will be very easy to drop in new NAT rules as the Nginx ingress load balancer is configured.
The rules are quite simple; one DNAT rule for each of HTTP and HTTPS, and a masquerade rule to fix the source/dest addresses to allow traffic to return to the correct place. I believe this could be applied to just about any router, so long as there is some sort of API or sufficiently hackable web UI.
Otherwise, the fallback solution would be to NAT all traffic to the control-node-0 server, and proxy it back to the virtual IP on whichever worker it resides on. This eliminates the failover aspect, so I wouldn’t really recommend it unless it’s strictly necessary.
I automated this using a fairly basic Bash script that templates the ’external’ IP of the load balancer, and applies that configuration to the Linux firewall.
Note that the user nat_update has write access via ACL to the file /etc/iptables/nat.rules. A separate process on the firewall is responsible for validating and merging the rules with its existing set. There’s almost certainly a better way to do this; but this works and that’s hard to argue with for a home-grown, hacked together cluster.
The system in action
To test the system out, I applied the manifests for the ‘Guestbook’ application and created an additional manifest for its ingress configuration:
---
apiVersion: networking.k8s.io/v1
kind: Ingress
metadata:
  name: guestbook-ingress
spec:
  rules:
  - host: foo.bar
    http:
      paths:
      - path: /
        pathType: Prefix
        backend:
          service:
            name: guestbook
            port:
              number: 3000
A few moments later, the configuration is applied and ready:
$ kubectl get ingress
NAME                CLASS    HOSTS     ADDRESS      PORTS   AGE
guestbook-ingress   <none>   foo.bar   10.1.0.103   80      45s
Then, by some absolute miracle all the pieces come together.
There are hits on the NAT translation rule, packets are directed to the correct node to reach the virtual IP, kube-proxy routes the request to the correct service, where the request is terminated at the pod and container responsible for returning the response. It’s horribly abstract, complex, and tightly coupled.
But it works, and that’s good enough for me.