Generating MSI transform files with Orca
Deploying MSI installers with group policy is super neat and super handy…. Most of the time.
Sometimes, though, you need a bit more than just the default options when pushing out packages, and for those of us that don’t have a wheelbarrow full of money to burn on System Center there are two ways to do this:
- Use a GP Preference Item to distribute a configuration file to managed systems
- Create a transform set to apply to the MSI installer file
While the first approach at first seems more straightforward, it does lead to the inevitable “GPO Spaghetti” once packages are added and removed. While MST installs are more technically involved, they’re a lot more manageable long term.
MSI packaging tools
To service MSI installers, we need a tool known as Orca.
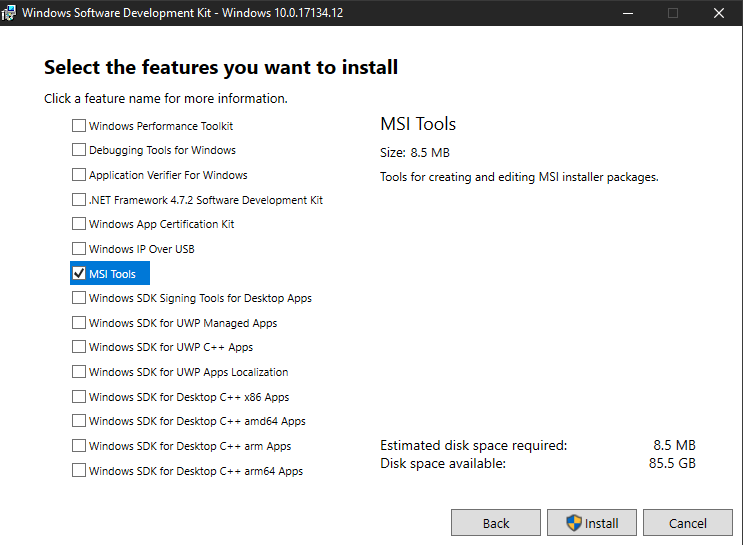
Orca is part of the Windows SDK, and can be installed with the MSI tools bundle. We don’t need the whole SDK, so only install the parts we need. After we accept the end user license agreement, we can select only the ‘MSI Tools,’ weighing in at a mere eight and a half megabytes.
After we’re done installing the MSI tools, we gear up to install Orca. On my version, it’s buried in the C:\Program Files (x86)\Windows Kits\10\bin\10.0.17134.0\x86 directory, but you may need to hunt around the Windows Kits directory to find the installer.
Ironically, Orca uses an MSI installer to install itself.
C:\> msiexec /i "C:\Program Files (x86)\Windows Kits\10\bin\10.0.17134.0\x86\Orca-x86_en-us.msi" /qb
Once it’s installed, we can open the program and start poking at some installers.
Taking apart the installer file
In this case, we are interested in configuring the Splunk Universal Forwarder to send events from Windows Servers to a local indexer for a lab environment. We can do this by adding the install switches to the transform file. Here’s how:
- Open the MSI package in Orca.
- Find the
Propertytable within the MSI - Create a new transform
- Transform > New Transform
- Edit the
Propertytable to contain the parameters we want to add
![]()
Reading the Instructions
Of course, now is a great time to check the documentation for our specific product and needs. Most packages that use MSI silent install switches will have a similar procedure.
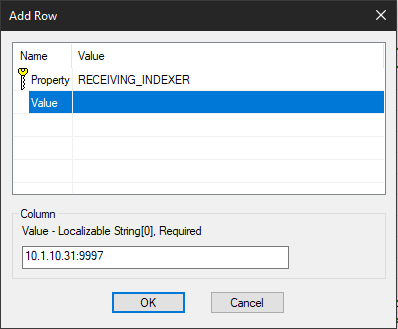
According to the Splunk Documentation, we need to configure the following parameters:
AGREETOLICENSE=YesRECEIVING_INDEXER="<host:port>"DEPLOYMENT_SERVER="<host:port>"
To add these configurations to the transform, we need to head back to Orca.
First, locate the AGREETOLICENSE key in the Property table. The default value will be ‘No’ so we will change it to ‘Yes’
Next we will add the indexer and the deployment server. Some of these aren’t configured by default, so we will need to make sure the installer will parse these parameters. The list of parameters with default values is usually called AdminProperties and its value is a semicolon separated list of keys. All we need to do here is make sure that all the new keys we will be adding are somewhere in the string. In this case, we need to add RECEIVING_INDEXER to the list.
Now that the installer knows what to do with our parameters, we can actually add them. Right click the table and click ‘Add Row’ then enter the key and value that will be added to the transform.
After all the parameters have been added to the transform, it’s time to export the finished patch file and get it ready for deployment. The MST is generated by going to Transform > Generate Transform and saving the file.
![]()
Deploying the package
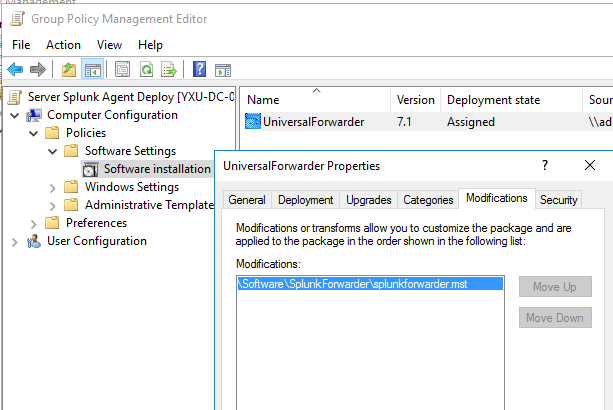
From here on out, we follow the usual methods for deploying software with GPO. In the group policy editor we create a new assigned application and select the MSI installer for Splunk Forwarder. Then, under Modifications the MST is selected. I recommend a replicated DFS network location for deploying software packages.
After satisfactory testing, we can roll this package out to our servers. After group policy has converged the next reboot will install the package on our servers. Within a couple minutes, the machines will start the local service and connect to the indexer.
And a quick ramble about security…
Now, let’s talk about why I did it this way. There is another way to set up Splunk, where a dedicated server will create event subscriptions to all the other servers and then it will send those to the indexer on their behalf. There are a number of security benefits to this:
- No extra binaries and services on other servers
- No need to restart mission critical servers to install the agent
- Exposing our servers to the splunk API is a bad idea
This is all valid.
However, there’s what I believe to be a bigger risk to this configuration: the service account!!!! Yes, service accounts are evil and bad. Since the forwarder needs to authenticate against all the servers that it will be logging it will need wide network access and privileged access to the servers it touches… And I’m sure many administrators simply give it Domain Admin (shudders) access as a quick and sloppy workaround. Alternatively, some may go the extra mile and set up a gMSA with the right access in all the right places, and honestly kudos to those guys. 👍
For our purposes, I think simply using the Local Service and not giving it any special domain access is the way to go since the only thing on the network it’s touching is the Splunk API. Our time would much better be spent configuring a proper cert on the server. As always, if you have something to say please send me a message!